Показаны сообщения с ярлыком аппликация. Показать все сообщения

понедельник, 19 декабря 2011 г.

Window Cat Family


Window Cat Family - revised for humans to follow

I keep forgetting that people just can't read my mind. Thank you to KittyDobson for pointing out the confusion inherent to the instructions for the window cats posted here previously.

Yikes!

Apologies, y'all. It was one of my first attempts at writing things down and I'm still figuring out how to do it smoothly and with some elegance... or at least not littered with editor foibles.

I am always open to questions and editing suggestions. Seriously. Please let me know.

Here's the revised version: (free PDF availabe at my section of the Ravelry store)


Window Cats

C. A. Lira 2008 (rev 2009)

Note: crochet thread size 10
hook size 9 (1.75mm)

Wider Window Cat - finished height 1 3/8”
1) ch3, slst into 2nd ch from hook, hdc in 1st ch worked, ch5, slst into 2nd ch
from hook, hdc into next ch (3rd ch of ch5) , ch2 t
2) sc in sc of previous row, sc in each of next 2 sts, 2sc in next st, ch2 t
3) skip 1st sc, sc in next 4 sts, sc in turning chain of previous row, ch2 t
4) scdec (include 1st sc), sc in next 2sts , scdec (include turning ch of
previous row), ch2 t
5) sk 1st st, (scdec) twice (include turning chain in 2nd dec), ch2 t
6) sc in each of 1st 2sts (including 1st sc), 2sc in next st, ch2 t
7) sc in each of 1st 3sts (including 1st sc) , 2sc in next st, ch2 t
8) sc in 1st 5sts (including 1st sc), 2sc in turning ch, ch2 t
9) sc in 1st 7sts (including 1st sc), 2sc in turning ch, ch2 t
10) sc in 1st 8sts (including 1st sc), 2sc in turning ch, ch2 t
11) sk 1st sc, sc in next 8sts, ch2 t
12) scdec (include turning ch), sc in each of next 5sts, scdec, sk turning ch of
prev row, ch2 t
13) sk turning ch, scdec, sc in each of next 3sts, scdec (include turning ch),
do not turn
14) ch12, hdc in 2nd ch from hook, sc in next ch, 2sc in next ch, sc in each of
next 7 chs, going up toward head sk last 2 Rows of body, slst to next st
on side of body, end off

Rounded Window Cat - finished height 1 ¼”
1) ch3, slst into 2nd ch from hook, hdc in 1st ch worked, ch5, slst into 2nd ch
from hook, hdc into next ch (3rd ch of ch5), ch2 t
2) sc in sc of previous row, sc in each of next 2 sts, 2sc in next st, ch2 t
3) skip 1st sc, sc in next 4 sts, sc in turning chain of previous row, ch2 t
4) scdec (include 1st sc), sc in next 2sts , scdec (include turning ch of
previous row), ch2 t
5) sk 1st st, (scdec) twice (include turning chain in 2nd dec), ch2 t
6) sc in each of 1st 2sts (including 1st sc), 2sc in next st, ch2 t
7) sc in each of 1st 3sts (including 1st sc) , 2sc in next st, ch2 t
8) sc in 1st 5sts (including 1st sc), 2sc in turning ch, ch2
9) sc in 1st 7sts (including 1st sc), 2sc in turning ch, ch2 t
10) sc in 1st 8sts, 2sc in turning ch, ch2 t
11) sk 1st sc, scdec, sc ineach of next 5sts, scdec, sk turning ch of prev row,
ch2 t
12) sk 1st sc, scdec, sc in each of next 3sts, scdec (include turning ch), ch2 t
13) sk 1st sc, scdec, sc in next st, scdec (including turning ch), do not turn
14) ch12, hdc in 2nd ch from hook, sc in next ch, 2sc in next ch, sc in each of
next 7chs, working up toward head sk last 2 Rows of body, slst to side of
next Row on body, end off

Window Kitten Kitty - finished height 1 ½”
1) ch3, slst in 2nd ch from hook, sc in next ch (first ch worked), ch5, slst in
2nd ch from hook, sc in next ch (3rd ch of ch5), ch2 t
2) sc in 1st sc of previous row, sc in each of next 2sts, 2sc in next st, ch2 t
3) sk 1st sc, sc in each of next 5sts, ch2 t
4) sk turning ch of previous row, scdec, sc in each of next 2sts, scdec
(include turning ch of previous row), ch2 t
5) sk1st sc, (scdec) twice (include turning ch in 2nd dec), ch2 t
6) sc in each of next 2 sts, 2sc in turning ch, ch2 t
7) sc in 1st 3 sts, 2sc in next st, sk turning ch, ch2 t
8) sk turning ch, sc in each of next 6sts (include turning ch), ch2 t
9) sk 1st st, sc in each of next 6 sts, do not turn
10) ch12, sk 1st ch, 2sc in each of next 3chs, sc in each of next 7chs, slst to
body at end of Row 9, end off

Teddy Bear Applique


Crochet - Teddy Bear Applique

Teddy Bear Applique
Designed by Crafts by Starlight
All Rights Reserved
So Cute! This Bear is made from Baby Cake Chenille yarn. You can also use a light size 3 yarn. This will go great on pillows, blankets, etc for your kids.

Materials: Baby Cake Chenille yarn or light size 3 yarn; Colors: Light brown and dark brown. Crochet hook size F. Darning need and brown thread

SL = Slip Stitch
SC = Single Crochet

SC2tog = Sichle Crochet 2 stitches together
SP(S) = Space(s)
CC = Change Color

Head: Dark Brown
Base: Ch 3
Rnd 1: 7 SC in 1st CH made, SL to 1st SC made, CH 1, turn.
Rnd 2: 2 SC in each sp around, SL to 1st SC made, CH 1, turn. (14 sts)
RNd 3: *SC, 2 SC in next sp, SL to 1st SC made, CH 1, turn.

Snout: Light Brown
Base: CH 3
Rnd 1: 7 SC in 1st CH sp made, SL to 1st SC made, Tie off. Hide string.

Ears: Light Brown
Base: CH 3
Rnd 1: 4 SC in 1st CH made, CC to Dark brown, CH 1, turn.
Rnd 2: 2 SC in each sp, tie off.
Tummy: Light Brown
Base: Ch 5
Row 1: 4 SC, CH1, turn.
Row2: 2 SC in 1st sp, 2 SC, 2 SC in last sp, CH 1, turn.
Row 3-4: 6 SC, CH 1 turn.
Row 5: SC2tog, 3 SC, SC2tog, CH 1 turn.
Row 6: 4 SC, CC to dark brown, CH 1, turn.
Row 7: SC around Perimeter 2 SC in the corner sts to it will lay flat.

Legs (2): Dark Brown
Base: Ch 4
Row 1-2: 3 SC, Ch 1, turn.
Row 3: SC, SK 1 sp, in next sp (4DC, SL) tie off, hide string.

Arms (2): Dark Brown
Base: CH 3
Row 1: 4 SC in 1st CH made, CH 1, turn.
Row 2: 2 SC in each sp across, tie off hide string.

Take a needle and brown thread and sew all the pieces together. Then sew on your intended project.
http://www.craftown.com/Teddy-Bear-Applique.html

Cats All Over the Place


Cats All Over the Place.

Now who would have imagined that the aromas of Thanskgiving would drive my cats that extra level of bonkers that makes them so darned endearing? :-]

These last two cat appliques are my favorites. They are in my usual, more confusing style - hard to figure out just what I mean by the written directions. Hope the charts help out! :-)


Stretching Cat Appliqué
C. A. Lira 2008

Note: crochet thread sz 10
hk size 9 (1.75mm)
finished height ~2”

ch21
Hind Leg
hdc, sc, sc & 2 hdc in next st, sc, hdc

Tail
ch12, scdec, sc4, scdec, sc2, hdc & dc in next st, dc in side of hdc, dc in same st as hdc

Rump
trc, trcdec

Chest
trc2, dc, dcdec

Head
Ear
ch5, slst, hdc, dc

Nose
ch3, sc, hdc, slst side of dc

Mouth
ch2, slst, sc in ch under ear

Neck
sc in side of dcdec of chest

Shoulder
hdc in same ch as dcdec of chest, sc

Front Paw
slst5, hdc, slst in same ch, end off


Cat Loaf Appliqué
C. A. Lira 2008

Note: crochet thread sz 10
hk size 9 (1.75mm)
finished length 1 ¼”

ch11
Rump
sc, hdc2, dc4, hdc

Head
Ear
ch5, slst, hdc

Face
ch1, trc in ch under ear, ch1, slst in side of trc, hdc next ch

Front Paws – top
sc side of hdc, slst2, ch1

Front Paws – bottom
sc3 in lps remaining from base ch

Tummy – under
slst3

Rear Paws – under
ch1, sc, hdc3, sc

Tail
ch5, slst to body at st 3rd from end, slst 2 at angle on body,
slst back in 6 slsts slst2 next ch, slst, slst to body, end off.


Sun Motif


Sun Motif Crochet Pattern


Sun Motif Crochet Pattern
by Debbie Williams

WW Yarn
Size G hook

Rnd 1: Chain 4, Make 9 double crochets in 4th chain from hook (the first one) Join to top of chain 4 with a slip stitch = 10

Rnd 2:Chain 1, single crochet in same space as joining, do 2 single crochets in each double crochet around.Join to first single crochet with a slip stitch.=20

Rnd 3: * Chain 7, Single Crochet in 2nd chain from hook, and the next 3 chains. Do 3 double crochets all in the next chain, single crochet in the next chain. Single crochet in the next 3 single crochets on Rnd 2. Repeat from * until 7 "rays" are done. Slip stitch in the base of first ray. Finish off, weave in loose end.http://debs1967.blogspot.com/2009/04/sun-motif-crochet-pattern.html

Sun


Free Crochet Pattern: Sun

By Rachel – 6 Comments
Here is another scrap yarn project! This sun can be used as an applique for clothing or bags. Or you may choose to use it as a fridgie by sticking a magnet to the back and putting it on your refrigerator. It’s all up to you and it’s really fast to crochet!
Skill Level:crochet skill level easy
Finished Size: 5 1/2″ (14 cm) diameter including the rays
crochet sun
Materials:
Medium Weight Yarn (small amount)
Crochet Hook I (5.50 mm)
crochet yarn size 4
Crochet Pattern: Sun
Round 1: ch 4, 12 dc in forth ch from hook, sl st in top of beg ch: 12 dc
Round 2: ch 3, 2 dc in each dc around: sl st in top of beg ch-3: 24 dc
Round 3: (ch 8, sc in second ch from hook, sc in next 6 ch, sl st in next 2 dc) 12 times
Finish off.
Need help with crocheting the sun? Let me know!

Птички


So Cute on a Little Hat!!!


You can use any yarn with appropriate size hook for this.  The yarn type & hook size will determine the finished size of the chick. The yellow one is made with worsted weight yarn & a 5mm hook. The finished size is 2.75 inches beak to tail & 2.5 inches top to bottom.

Here is the basic technique.
ch = chain 
sl st = slip stitch
sc = single crochet
dc = double crochet
hdc = half double crochet
trc = triple crochet
quadc = quadruple crochet, yo 3 times, insert hook into st, pull up loop, yo pull through 2 loop 4 times
pentc = penta crochet, yo 4 times, insert hook into st, pull up loop, yo pull through 2 loops 5 times

Sorry for the weird names of quadc & pentc, but I don't know the names of these stitches, so I called them what made sense to me. Does anyone know their official name? Couldn't find it on google.

R1 - 10 sc in a magic loop. If you don't know how to crochet in a magic loop you can watch a video here.  Tighten your magic loop but do not join with a slip stitch as you may be accustomed to doing. Instead just make the first stitch on the second round in the first sc of the first round. 

R2 - 2sc in the first st (you may want to mark the first sc with a stitch marker), sc in 2nd, hdc then dc in 3rd, 2dc in 4th and 5th, 2sc in 6th, sc then dc in 7th,  2 trc in 8th, 2 quadc in 9th,  2 quadc in 10th. Again do not join.

R3 - Now your next stitch should be the first sc of the second round. In this stitch do 2 quadc & 1 pentac. Ch1, sl st in the same space (this will give a tiny point to the tail feathers). Now sl st down the side of the pentc going right to left. Join when you meet up with the next stitch.  It will look like this.


Now you should see the shape of the chick, but the tail part has such long stitches that it doesn't hold together.  So, tie off leaving a long tail to sew with. Flip the chick over and sew up and down the backs of all those stitches.  You will see little loops going up the back of each stitch.
Sew up and down under these little loops in rows to secure your stitches together.


For the eye sew a french knot between the 7th & 8th stitch of the second round. I first sewed a small straight stitch between the two catching a few threads from each and then sewed the french knot into the straight stitch to give it something to hold on to. 

For the beak - join beak yarn in the 10th stitch of the second row. sc in the same stitch. fasten off and weave ends.

Hope you enjoy making these chickies! If you do please let me know! I'd love to see pic's! If you have any questions please don't hesitate to ask in comments or email me at mail.oodles4noodles@gmail.com

 © 2011 Carrie A. Piper
****You may do anything you like with items you make using my patterns.  If you sell them on-line I only ask that you link back to the post. You may also link back to this post on any blog or website. Please do not copy any part of this pattern and claim it as your own or copy and re-post it elsewhere. Thank You ****http://oodles4noodles.blogspot.com/2011/04/turorial-tuesdays-spring-chick-applique.html

Snowman Applique

This has not been tested.

Snowman Appliqué 
Copyright 2007 (Do not sell this pattern)
CrochetbyCharlene


Any yarn desired. This will make your snowman different sizes.
I used Caron Simply Soft 

You will need:

F Hook
H Hook
J Hook
Tiny buttons or Pom Poms
Wiggle Eyes

Large Circle: Chain 4 and make a ring. Chain 2 (not a stitch).
Rd. 1 12 hdc in ring. join to 1st hdc. Chain 2 (12 hdc)
Rd. 2 2 hdc in each hdc around. Join to 1st hdc (24 hdc)
Do not fasten off, but change to H hook. 

Middle Circle: Chain 3. 
Rd. 1 12 hdc in 3rd chain from hook Join to 1st hdc (12 hdc)
Rd. 2 Repeat previous Round 2. (24 hdc)
Do not fasten off. Change to F hook.

Small circle: Repeat middle circle. 

Edging: Change back to H Hook. Slip stitch around joining circles. Fasten off and weave in ends, 

Nose: Chain 4 Slip Stitch in 4th chain from hook and fasten off. Put ends in the middle of the small circle and weave in the ends, 

Hat: H Hook.
Chain 11 
Row 1 Sc in 2nd chain from hook across. (10 sc) turn
Row 2 slipstitch in the 1st 2 sc. Chain 1 hdc in same stitch and in the next 5 sc. Chain 1 (hdc) turn. 
Row 3 sc across (6 sc)
Row 4 Repeat row 3. http://www.crochetville.org/forum/showpost.php?p=967400&postcount=1

Appliques

Аппликации крючком

Кружевные аппликации «Зверюшки»


Кружевные аппликации «Зверюшки»

Мне очень нравится вязать всякие мелкие штучки крючком. Это быстро, захватывающе и интересно.
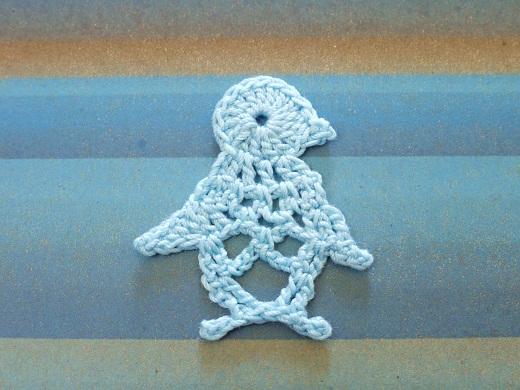
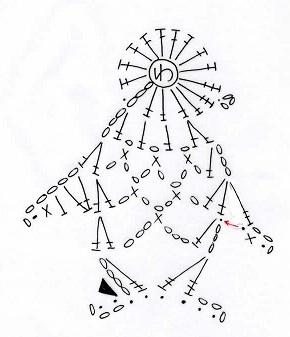
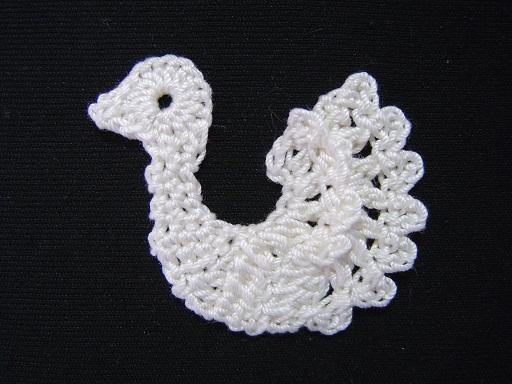
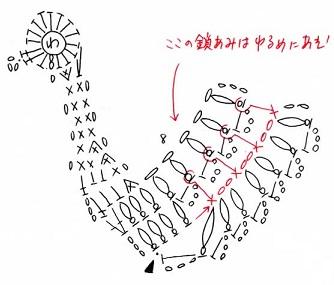
Вязаные аппликации, которые я нашла на одном японском сайте, как раз из их числа. Так и хочется сразу взять и связать. Какие миленькие зверюшки!
Ура! Теперь у меня будет чем украсить детские вещички, кроме стандартных «цветочков-листочков»!
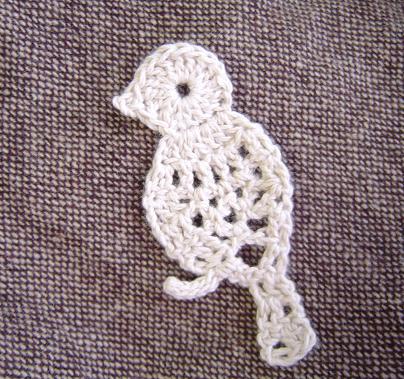
Вот, например, птичка-невеличка.
Птичка
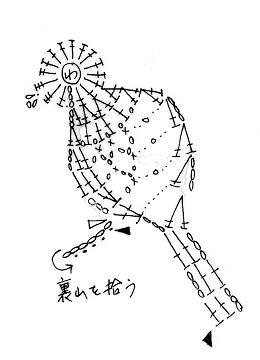
Схемка к ней.
Вязаные аппликации, кружевные мотивы крючком

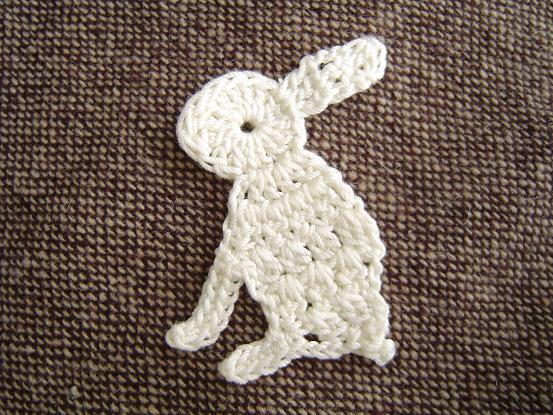
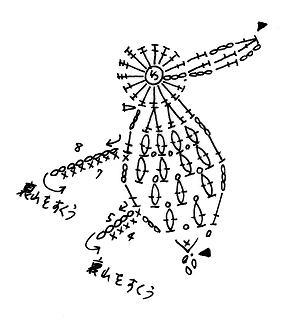
Зайчик-попрыгайчик.
Вязаные аппликации, кружевные мотивы крючком

Вязаные аппликации, кружевные мотивы крючком
Пингвин.
Вязаные аппликации, кружевные мотивы крючком

Вязаные аппликации, кружевные мотивы крючком
Лебедь.
Вязаные аппликации, кружевные мотивы крючком

Вязаные аппликации, кружевные мотивы крючком
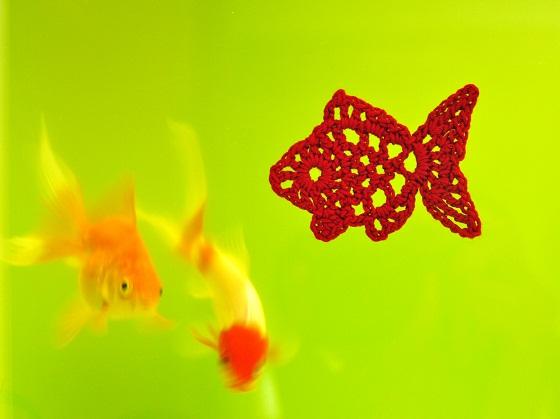
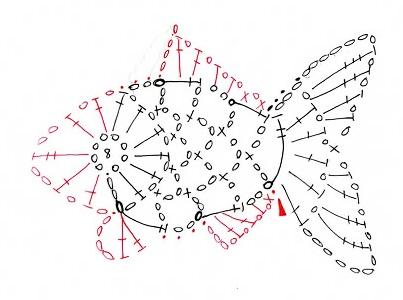
Рыбка.
Вязаные аппликации, кружевные мотивы крючком

Вязаные аппликации, кружевные мотивы крючком
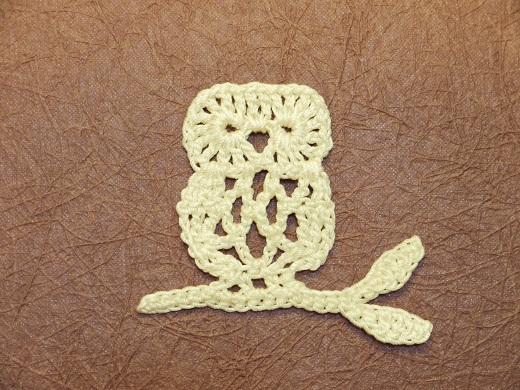
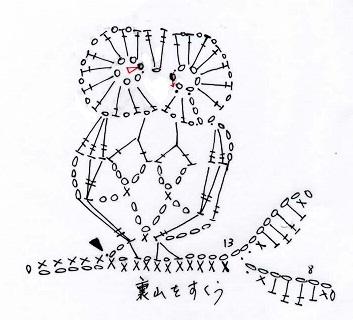
Сова на ветке.
Вязаные аппликации, кружевные мотивы крючком

Вязаные аппликации, кружевные мотивы крючком
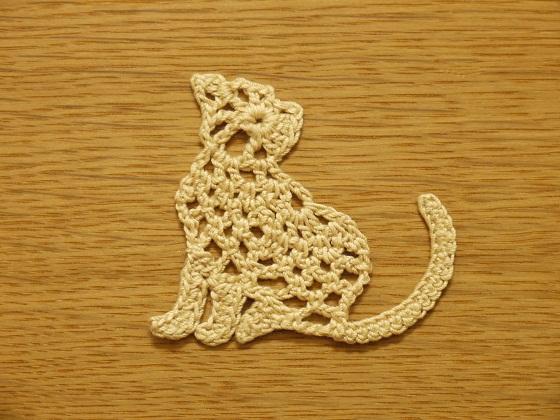
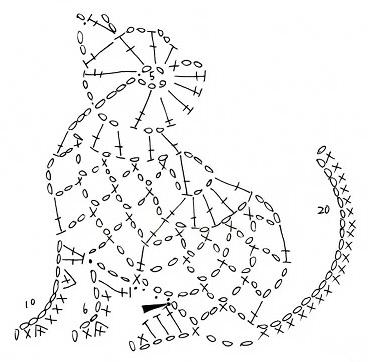
Кошка.
Вязаные аппликации, кружевные мотивы крючком

Вязаные аппликации, кружевные мотивы крючком
Здорово, что не надо дополнительно вышивать в этих аппликациях глазки, носы и т.д. Связал и готово!
Чтобы мотивы держали форму, как на рисунках, лучше всего вязать их из мерсеризованного хлопка.http://moipetelki.ru/blog/dekor/kruzhevnye-applikacii-zveryushki/

Rounded Five-Petal 3" Flower Applique


Free Pattern: Rounded Five-Petal 3" Flower Applique


Bonus pattern this week!  Since these flowers are not exactly ground-breaking, I didn't think they each deserved their own week.  :)

Supplies:
Small amount of worsted weight yarn
5mm (H/8) hook

Abbreviations:
ch: chain
sc: single crochet
dc: double crochet
tc: treble (aka triple) crochet
sl st: slip stitch
st: stitch - can mean sc or sl st

Flower Instructions:
Magic ring, ch 1
Round 1: 7 sc in ring.  Pull ring tight.  Join with sl st to first sc.
Round 2: 2 sc in each st around (14 sc) Join with sl st to joining ch.
Round 3: Ch 2.  Dc in same st.  Tc in next st.  In next st, dc, ch 2, sl st.  Ch 2.  *Dc in next st. Tc in next st. In next st, dc, ch 2, sl st.  Ch 2, repeat from * 3 times.  Sl st, finish off with a long end for attaching.  Weave in other end.

Center Instructions:
Magic ring, ch 1.
Round 1: 5 sc in ring.  Do not join.
Round 2: 2 sc in each sc around.  (10 sc)  Finish off with a long tail for attaching to flower, weave in the other end.

Assembling: Sew Center to center of Flower.  Sew Flower to whatever you want!


Here, this Flower and the Tulip-Like Flower are shown as appliques on #1's diaper stacker.

©2010 Alli Hyer, all rights reserved.  You may sell items made with this pattern.  You may not sell this pattern or claim it as your own.  You may publish or post a link to this pattern, but you may not publish or post this pattern in whole or in part.http://allicrafts.blogspot.com/2010/12/free-pattern-rounded-five-petal-3.html

Reindeer Appliqué

Reindeer Appliqué

Items Needed:
Any Size Hook (I used an I)
WW yarn
Red (or any color) Pom Pom
2 Medium-sized Wiggle eyes

Head
Chain 3
Round 1: 13 dc in 3rd ch from hook. Join to 1st dc (13dc)
Round 2: Ch. 1, triple crochet in same stitch and in the next 2 dc, slst in the next 3 dc, (*sc, hdc, dc, chain 2, dc, hdc, sc) in the next dc, slst in the next 3 dc, repeat * in the next dc for 2nd ear, slst in the last 3dc and join to ch.1. 

Antlers
Join yarn in sc of right ear and *chain 6, sc in 3 chains, chain 3, slst in 3rd chain of chain 3, sc in last 2 chains from original chain 6, slst in the next 4 dc, turn, in 4th slst repeat * slst back in the 4th slst and fasten off.

Weave in all ends. Glue Pom Pom and wiggle eyes on. http://www.crochetville.org/forum/showpost.php?p=1399537&postcount=1

OWL APPLIQUE


OWL APPLIQUE CROCHET PATTERN


Owls are so popular right now. I didn't want to write up an actual animal hat pattern since there are many out there plus I love the one I have already. So  I thought I'd try my hand at something different.


I made up this (I think) absolutely adorable owl applique. It can me made to use on hats, headbands, scarfs, clothing and more. I hope you enjoy it.


This is my person pattern and I don't mind if you sell items made from it but please don't copy and steal the pattern. Please just link back to my sight!  Thanks ;)

OWL APPLIQUE PATTERN:


Materials:

Size F Hook (3.75 )

Worsted Weight yarn - I used "i Love This Yarn: Hobby Lobby brand"
Tapestry needle


RD 1 : ch 10, sc in 2 ch from hook, sc in each ch across with 3 sc in last ch, continue around to opposite side of ch, sc in each ch to 1st sc and join w/ sl st

RD 2:  ch1, sc in same st, ch 5, sl st in same sc, sc in next 7 sc, ch 5, sl st in same sc, sc in next sc, 2 sc in next sc, sc in next 10 sc , ch 1 turn

(rest of applique is worked in rows)

Row - 1 sc in next 9 sc, ch 1, turn (9)
Row 2- 6 sc in each sc across, ch 1 , turn  (9) 
Row 7 sc dec, sc in next 5, sc dec, ch1 turn
Row 8 sc dec, sc in next 3, sc dec, ch1 turn

Fasten off, weave in ends

eyes: make 2 
ch 3 ,  8 hdc in 1st ch, join with sl st to 1 hdc

Sew on eyes - close together between the ears/horns, I then used black thread to make a few embroidery stitches for the pupal. 

Beak - embroider on in a triangular shape in between the eyes.

Feet - Make 2 

Row 1: chain 4, se in 2nd ch from hook and each ch across, ch 1 turn (3)
Row 2: sl st in 1st sc, ch 3 sl st in same sc (3 times)
fasten off, weave in ends

Sew feet to applique. 


I hope you love it as much as I do. You do have permission to sell items make from this pattern but not the pattern itself. If you do sell these I just ask that you link back to me :)http://calleighsclips.blogspot.com/2010/12/owl-hat-applique-crochet-pattern.html

Mushroom Applique


Mushroom Applique

This is the pattern for making the mushroom applique I used on the Mushroom Festival Doll Dress. Its simple, easy, and cute!

Use medium weight yarn in beige and white, and a crochet hook size F 3.75.

Mushroom Cap

Row 1: With beige yarn, Ch 4, sl st into first ch to make a ring. Ch3, dc 8 into ring. Ch 2, turn.
Row 2: 2 dc in each dc across. Sl st and break off. Weave in ends.

Stem

Row 1: With white yarn, ch 8. Sc in second ch from hook and each ch across. Ch 1, turn.
Row 2: Sc in each sc across. Ch 1, turn.
Row 3: Sc in each sc across. Sl st, break off, weave in ends.

Sew the cap and the stem together and use as an applique for anything. So adorable, and I hope you enjoy!http://fatcatcrochetcorner.blogspot.com/2010/09/mushroom-applique.html

Little Bear Appliqué


Little Bear Appliqué /Pin /Fridgie
CROCHET PATTERN
USA Terms / UK Terms
by Linda Z. O'Halloran
May 2010

I couldn't find a little bear appliqué, so I designed one.
They are 3.5 inches long with 3.5mm hook and DK yarn.
With 4.0mm hook and Aran yarn, would be slightly bigger.
Quick and easy.
Something fun to sew onto blankets or clothing to add interest.
 
Here are the instructions in UK/ Irish terms:

Base Circle for Head and Body...
Round 1.  Ch2. Do 6 dc in 1st chain. Pull end to tighten. Join with slip st to 1st dc.
Round 2.  Ch1, 2 dc in same st as joining. Do 2 dc in each dc around. (12 dc)
Round 3.  Ch1, 2 dc in same st as joining. (dc in next dc, 2dc in next dc) around. Join
                with slip st in first dc. (18 dc)

For Head:
To the above base circle....
Round 4.  In next dc make ear.
               Ear = (slip st, ch2, 2 tr, ch2, slip st)
               Then slip st in next 5 dc.
               In next dc make 2nd ear like the 1st.  Slip st in next 11 dc. 
               Fasten off, but leave a 7 inch length of yarn for joining head to body.
Snout (optional): For a 3-dimensional effect, you can use the length of yarn (left at the beginning)
to make straight stitches radiating from the center...


For Body:
To a 2nd base circle as in Rounds 1-3 above...
Round 4.  Ch1, 2 dc in same st as joining.  Repeat (1 dc in each of next 2 dc, 2 dc in next dc) around.
                 join with slip st to first dc. (24 dc)

Round 5.  Make leg in next 2 dc as follows....
                Leg = (slip st, ch4, ttr) in next dc, then (ttr, ch4, slip st) in next dc.
                  (Note: ttr starts with 3 wraps around hook).
                 Slip st in next 4 dc.  
Then make arm in the next 2 dc as  follows...
                 Arm = (slip st, ch4, dtr) in next dc, then (dtr, ch4, slip st) in next dc.
                  (Note: dtr starts with 2 wraps around hook).
                 Slip st in next 7 dc.    Make 2nd arm as the 1st.
                 Slip st in next 4 dc.  Make 2nd leg as the 1st leg.
                 Slip st in next dc.  Join with slip st to first st. Fasten off.

Embroider face with contrasting dark yarn, making 3 french knots for eyes and nose. Make straight lines for mouth.
Add pin or magnet or sew onto clothing as you wish.

================================
 
Here are the instructions in USA terms:

Base Circle for Head and Body...
Round 1.  Ch2. Do 6 sc in 1st chain. Pull end to tighten. Join with slip st to 1st sc.
Round 2.  Ch1, 2 sc in same st as joining. Do 2 sc in each sc around. (12 sc)
Round 3.  Ch1, 2 sc in same st as joining. (sc in next sc, 2sc in next sc) around. Join
      with slip st in first sc. (18 sc)

For Head:
To the above base circle....
Round 4.  In next sc make ear.
                  Ear = (slip st, ch2, 2 dc, ch2, slip st)
                  Then slip st in next 5 sc.
                  In next sc make 2nd ear like the 1st.  Slip st in next 11 sc. 
                  Fasten off, but leave a 7 inch length of yarn for joining head to body.

Snout (optional): For a 3-dimensional effect, you can use the length of yarn (left at the beginning)
to make straight stitches radiating from the center...


For Body:
To a 2nd base circle as above...
Round 4.  Ch1, 2sc in same st as joining.  Repeat (1 sc in each of next 2 sc, 2sc in next sc) around.
                 join with slip st to first sc. (24 sc)

Round 5.  
Make leg in next 2 sc as follows....
                  Leg = (slip st, ch4, dtr) in next sc, then (dtr, ch4, slip st) in next sc.
                    (Note: dtr here starts with 3 wraps around hook.)
                  Slip st in next 4 sc.  Then make arm in the next 2 sc as  follows...
                  Arm = (slip st, ch4, tr) in next sc, then (tr, ch4, slip st) in next sc.
                     (Note: tr here starts with 2 wraps around hook.)
                  Slip st in next 7 sc.    Make 2nd arm as the 1st.
                  Slip st in next 4 sc.  Make 2nd leg as the 1st leg.
                  Slip st in next sc.  Join with slip st to first st. Fasten off.

Embroider face with contrasting yarn, making 3 french knots for eyes and nose. Make straight lines for mouth.

Add pin or magnet or sew onto clothing as you wish.

Email Me if you have questions or find errors.
Feel free to use and share this pattern, to sell items made using this pattern,
or to improve on the pattern.
http://homepage.eircom.net/~lindaohdsl/BearApplique.html