среда, 21 декабря 2011 г.

Бомбочки для ванны своими руками


Бомбочки для ванны своими руками. Доставим себе удовольствие?

Маха ФлайМаха ФлайДебютантОпубликовано 30.08.2009      4     80992     Распечатать

Сейчас существует множество замечательных средств, с которыми принимать ванну намного приятней, комфортней и полезней. Это морская соль, пена для ванн, мыльные конфетти, эфирные масла и многое другое. Я, например, люблю добавлять в воду мед и лепестки роз. Все это можно и совместить (в разумных пределах, конечно). Причем сделать это красиво и своими руками.
Но сначала небольшая предыстория.
После прочтения статьи Катерины Бойковой «Как самому приготовить мыло? Мыльные фантазии в домашнем исполнении», я буквально зависла на форумах на несколько дней, переходя со ссылки на ссылку… Эта тема так меня увлекла, что захотелось сделать что-нибудь самой!
Часто рядом с описанием процессов и результатов изготовления мыла встречались посты о «бомбочках», шариках для ванн, «шипучках». Они меня очень заинтриговали. Оказалось, изготовить их можно достаточно просто и быстро, к тому же они не требуют никаких сложных ингредиентов. Поэтому для начала захотелось попробовать сделать именно их.
Итак, я решилась! Купила необходимые составляющие и взялась за дело. Если Вы уже заинтересовались, то рассказываю, что для этого нужно:
1. Сода – 8 ст. л.;
2. Лимонная кислота – 4 ст. л.;
3. Сухое молоко или крахмал (картофельный или кукурузный) – 2 ст. л.;
4. Базовое масло (оливковое, облепиховое, грецкого ореха, жожоба, миндаля, виноградных косточек или другое – на ваш выбор) – 1 ст. л.;
5. Можно использовать кокосовую стружку, перемолоть ароматизированный зеленый чай или другую полезную травку, измельчить морскую соль, небольшие лепестки цветов. Только нужно учитывать, что наполнитель должен быть достаточно мелким, иначе он будет мешать слипанию «бомбочек»;
6. Ваше любимое эфирное масло – несколько капель.
Пункты 5 и 6 можно смело опустить. Вам понадобятся перчатки, кофемолка или ступка, небольшие формочки. В качестве последних можно использовала баночки от киндер-сюрпризов, детские формочки для песка или для печенья, баночки от йогуртов и многое другое. Главное, чтобы они были не слишком большие, желательно – пластиковые или силиконовые (чтобы легко было доставать «бомбочку»).
Ну что ж, приступим. Соду потолочь, если есть уплотнения – разбить их. Лимонную кислоту измельчить в кофемолке (или тщательно разбить в ступке). Смешать все приготовленные ингредиенты. Работать лучше в перчатках, поскольку руки могут вспотеть, а это не очень хорошо отразится на ваших бомбочках (сода и лимонная кислота вступят в реакцию и начнут «шипеть» раньше времени). Из этих же соображений старайтесь избегать любого контакта вашей смеси с водой.
Теперь попробуйте сжать немного полученной массы в кулаке – она должна плотно держатся, но при нажатии легко рассыпаться. Если она слишком рыхлая, попробуйте добавить немного базового масла (буквально пол столовой ложки) и еще раз тщательно перемешать.
Теперь надо очень плотно утрамбовать полученную смесь в формочки. Дать им постоять около часа (можно и меньше). Причем шипучки должны находиться в сухом месте, иначе их поверхность начнет некрасиво пузыриться. Потом аккуратно вытряхнуть бомбочки (слегка надавить на форму, постучать по столу) и дать им вылежаться около суток – опять же, в сухом месте.
На следующий день можно набрать ванну воды и положить в нее «бомбочки» (одну или несколько, в зависимости от размера). Они очень мило шипят и пузырятся, наполняя воду полезностями и приятным ароматам. Теперь Вы можете смело нежиться в ванне, получая неземное удовольствие от сотворенного собственными руками маленького чуда. Ну, а если у Вас есть ребенок, то для него такое купание станет настоящим праздником! Кроме того, такая «шипучка» может стать замечательным подарком.
В качестве бонуса Вы получаете бархатную нежную кожу, гладкие волосы, прекрасное настроение. Для себя я сделала еще одно замечательное открытие: после такой ванны эпиляция становится существенно менее болезненной! Правда, затрудняется движение эпилятора по коже, но зато волосы удаляются практически неощутимо!
В общем, творите, экспериментируйте, и ваша жизнь станет чуточку интересней!http://shkolazhizni.ru/archive/0/n-29079/
понедельник, 19 декабря 2011 г.

Oak Leaf Crochet Pattern


Oak Leaf Crochet Pattern

fall crochet garland
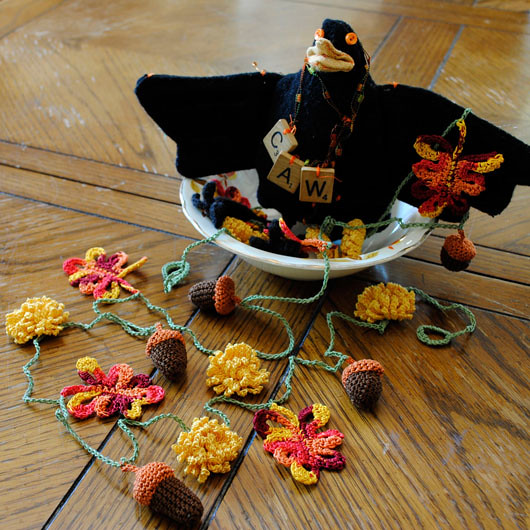
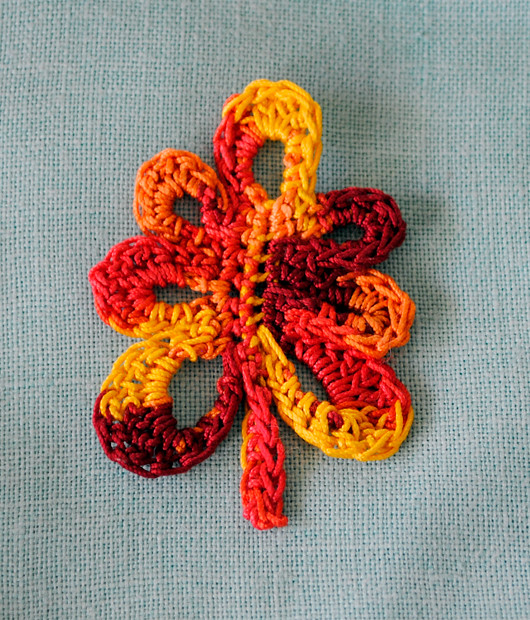
A few weeks ago, I showed you this autumn garland I had just made.  When I got the idea, I searched around and just couldn't find an oak leaf pattern that I liked.  So I made up my own.  I've never written a crochet pattern before, and I would so love it if you crocheters out there would pull out your hooks and try this pattern out to see if it makes sense.  And give me feedback of course about the parts that are confusing or just plain wrong.  I used size 10 pearl cotton and a USA size 7 steel hook.  When I get the acorn pattern worked out just right, I'll post it as well.

crochet oak leaf


Crochet Oak Leaf (appr. 2" long)

ch 15; sc in 2nd ch from hook; sc in each ch to end (14 sc).

ch 7; sc in first sc going down the other side; sc in next 2 sc

(ch 7, sc in same sp as last sc; sc in next 2 sc); repeat once

ch 9, sc in same sp as lst sc.  ch 1. turn.

In ch9 loop work: 1 sc, 1 hdc, 2 dc, 3tr, 2dc, 1 hdc, 1sc; sc in next 2 sc.

In ch 7 loop work: 1 sc, hdc, 2dc, 1tr, 2dc, hdc, 1sc.  sc in each of next 2 sc.

In ch7 loop, work: 1sc, 2hdc, 2dc, 2hdc, 1sc.  sc in next 2 sc.

In top chain 7 loop work: 1sc, 1hdc, 1dc, 3tr, 1dc, 1hdc, 1sc.

(sc in next 3sc.  ch 7, sc in same space as last sc)  repeat once.

sc in next 2 sc.  ch 9, sc in same sp as lst sc.  ch 1; turn.

In ch9 loop work: 1 sc, 1 hdc, 2 dc, 3tr, 2dc, 1 hdc, 1sc; sc in next 2 sc.

In ch7 loop work: 1sc, 1hdc, 2dc, 1tr, 2dc, 1hdc, 1sc; sc in each of next 2 sc.

In ch7 loop, work: 1sc, 2hdc, 2dc, 2hdc, 1sc; sc in next 2 sc. 

sl st in next sc.  fasten off.  With a large needle, sew in your ends.  Iron to flatten and shape.

Let me know how this works out, ok?  Thanks!http://bobbilewin.blogspot.com/2010/08/oak-leaf-crochet-pattern.html

КАК КРАХМАЛИТЬ ВЯЗАНЫЕ ВЕЩИ


Различают три вида крахмаливания: мягкое, средней плотности и жёсткое. Для первых двух видов крахмал (картофельный или кукурузный или рисовый в смеси) размешивают в холодной воде, чтобы получилась кашица, а затем вливают кипяток. Для мягкого крахмаливания на один литр воды берут одну столовую ложку крахмала, для среднего - полторы ложки. К крахмальному раствору добавляют немного бельевой синьки. Раствор процеживают через марлю, иначе могут остаться комочки.
Для жесткого крахмаливания следует крахмал развести холодной водой (на литр воды две столовых ложки крахмала). Кипятить раствор не надо. Хотя другие считают иначе. Клейстер должен быть прозрачным и если он мутнеет, его следует прокипятить в течение 5 минут.
Мягкое крахмаливание подходит больше всего для блузок и платьев из лёгкой ткани, для носовых платков, среднее - для постельного и столового белья, тюлевых занавесей. А манжеты, воротнички и мужские сорочки крахмалят жестко (если вы хотите и желаете крахмалить эти изделия).
Тюлевым занавескам можно придать блеск, добавив две чайных ложки талька на литр крахмального раствора.
Вещи из синтетического волокна не крахмалят.
Что касается нательного белья, то крахмалить его вообще не рекомендуется. Крахмал заклеивает поры ткани, она теряет воздухопроницаемость и делается менее гигиеничной. А воздушный слой между телом и одеждой должен быть чистым.
Если крахмальное белье лежит в сыром помещении, на ткани может появиться плесень и испортить белье.
Готовую салфетку стирают и крахмалят, после чего накалывают на белую плотную бумагу, на которую предварительно нанесен рисунок салфетки в натуральную величину. При этом плетешки прикрепляют булавками к соответствующим местам рисунка, после чего проглаживают утюгом с изнаночной стороны. Если изделие влажное, гладят через ткань по лицевой стороне, ведя утюг от середины к краям.
Как вариант можно не крахмалить, а сахарить: сварить сахарный сироп (не очень крутой, на полстакана кипятка три столовые ложки сахара), а потом в этот кипящий раствор вливать, постоянно помешивая, разведенный в холодной воде крахмал. Учтите, что сахар может привлечь насекомых-паразитов.
Иногда для крахмаления используют клей ПВА. Пропорция - одна часть клея на на 1-2 части воды в зависимости от густоты клея.
Некоторые считают, что если модель шляпы предполагает строгий силуэт, то лучше использовать раствор желатина, так как крахмал осыпается и шляпка может потерять форму. Замачивают 1 столовую ложку желатина в небольшом количестве холодной воды. Когда он разбухнет доливают воды, чтобы получился стакан, нагревают до полного растворения желатина. А далее - как с крахмальным раствором.
Разумеется, можно крахмалить готовыми растворами, продающимися в магазинах.
Глянец-крахмал. Этот вид крахмала применяют для придания белью, кроме определенной стойкости, ещё и красивого блеска. Состав его такой: рисового или пшеничного крахмала 5 частей, белого талька 3 части, буры (порошка) 1 часть. Все составные части тщательно смешивают. Порошок смачивают холодной водой и наносят мокрой тканью на бельё. При глажении горячим утюгом крахмал клейстеризуется и придаёт белью блеск и некоторую плотность. Другой состав такого крахмала: борной кислоты 2 части, буры 10 частей, рисового крахмала 8 частей. Всё это смешивают. (источник)
Если крахмал засорен, имеет сероватый или желтоватый оттенок, перед использованием его необходимо очистить. Для этого крахмал взбалтывают с водой, отстаивают, воду сливают и удаляют верхний загрязненный слой. Так делают 23 раза. Если требуется, крахмал процеживают через сито.
При крахмаливании белых кружевных изделий для растворения крахмала применяется не вода, а холодное обезжиренное молоко. Изделие после крахмаления молочным клейстером приобретает приятный матовый оттенок. Из крахмалов наилучшим является рисовый.
Изделия из черных ниток не крахмалят, а аппретируют только смачиванием водой, так как крахмал на темных нитках становиться очень заметным. (Аппретирование - одна из заключительных операций отделки материаловhttp://blogs.privet.ru/community/vazalka/66331418

cute bookmark


Book Thong

 Dec 29, 2005 


Author

by Donna Hulka

Introduction

book thongRecycle those paper bookmarks you get for free at the bookstore. Chuck those decrepit woven things you've kept since childhood. Take a few minutes to crochet yourself a simple, elegant book thong that will make you feel like the sophisticated intellectual you know you are.

Materials List

Small amount of size 10 cotton crochet thread
Size 7 (1.65 mm) steel crochet hook
Beads that will fit snugly over the crocheted chain (center hole of approximately 2mm)
book thong in actionStitch marker
Needle with an eye large enough for the crochet thread

Finished Size

One size.

Notes

When you make a chain, the front looks like a series of Vs (and each V has a top and bottom loop) and the back looks like a series of bumps that forms a spine or ridge.
US pattern notations usedch = chain
sl st = slip stitch
sc = single crochet

The Pattern

Up one side:

figure 1You’re starting at the bottom (tassel end) of the bookmark. Leave a long tail, about 12 inches, because you’ll need room to do a little stitching with it later. Chain 150. Thread your top bead (the bead you’ve chosen for the non-tassel end of the bookmark) onto the chain from the tail end and bring it close, but not all the way, to the working end.

And down the other:

figure 2Working back down the chain on the other side of the bead, inserting your hook through both the top loop and back ridge (Figure 2), sl st into a chain stitch that will allow the chain to wrap gently and snuggly around the bead (Figure 3). (Note: Inserting through both the top loop and back ridge on this ch makes the joining near the bead more secure.) Sl st, inserting your hook through the back ridge only, in the next ch and in each ch across until you have about three inches of chain left. Remove your hook and place a stitch marker to hold the last stitch (you’ll come back to this later). Thread thfigure 3e rest of your beads on from the tail end and push them up to the stitch marker (Figure 4).


figure 4

Make ring for tassel:

Insert your hook in the 8th chain from the tail (Figure 5) and pull the tail through to form a ring (Figure 6).
figure 5   figure 6
Insert your hook through the same chain and pull the tail through again, pulling it gently snug to secure it. Insert your hook through the same chain a third time and pull the tail through, leaving a loop rather than pulling it tight; insert your hook in the loop (Figure 7), sc into the ring (Figures 8 and 9), and finish off.
figure 7
figure 8    figure 9
The ring just made is where you will insert the tassel later. Push your beads down to the sc just made (Figure 10).
figure 10

Finish going down the other side:

Remove the stitch marker and continue to sl st in the back ridge of each chain until you reach the beads, and finish off. (Figure 11). Work in ends with a needle.
figure 11

Add tassel:

Cut 16 pieces of thread, each 8 inches long. Holding all strands together, fold in half, insert J hook into ring and draw the fold through, draw the loose ends through the loop made by the fold and gently tighten. Trim evenly to desired length.
http://crochetme.com/media/p/88334.aspx

Free Crochet Patterns

free crochet patterns and tutorials

Bookmarks

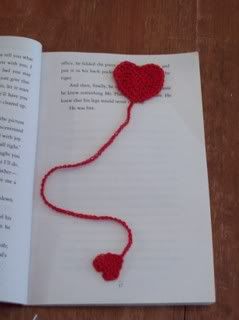
I Give You My Heart Bookmark


I Give You My Heart Bookmark
small amount size 10 bedspread crochet thread
1.65 mm steel hook (size 7)
Stiffener of your choice
tapestry needle

chain 2
R 1: work 6 sc in first chain. Join to first sc
R 2: ch 2, work 2 hdc in same sc and in each sc around. Join to first hdc (12 hdc)
R 3: ch 2, dc in same hdc, 2 dc in next stitch, dc in next, 2 dc in next stitch, dc in next, 2 dc in next stitch, sc in next, 2 dc in next stitch, dc in next, 2 dc in next stitch, dc in next, 2 dc in last stitch, join to first dc. (17 dc and 1 sc)
R 4: ch 2, dc in same stitch, hdc in each of next 2 stitches, (hdc and dc) in next stitch, dc in next, (dc & trc) in next, 3 trc in next, (trc & dc) in next, hdc in next, sl st into sc of previous row, hdc in next, (dc & trc) in next, 3 trc in next, (trc & dc) in next, dc in next, (dc & hdc) in next, hdc in each of last 2 stitches. join to first dc.
chain 70
beg small heart
3 trc & 1 dc in 3rd chain from hook, 2 dc in next chain, sc in next chain. Turn so that you can work in the opposite side of the chains you just worked in. Sc in same chain as previous sc, 2 dc in next chain, dc &3 trc in last chain. Ch 2 and join with a sl st to last chain. Finish by weaving in ends. On the small heart end I used the tail to sew up the gap in the center.
Stiffen the hearts using your desired method. I left the chain loose but you can stiffen it also if you would like. This would also look cute if you added some ultra fine glitter when stiffening.

heart bookmark

Window Cat Family


Window Cat Family - revised for humans to follow

I keep forgetting that people just can't read my mind. Thank you to KittyDobson for pointing out the confusion inherent to the instructions for the window cats posted here previously.

Yikes!

Apologies, y'all. It was one of my first attempts at writing things down and I'm still figuring out how to do it smoothly and with some elegance... or at least not littered with editor foibles.

I am always open to questions and editing suggestions. Seriously. Please let me know.

Here's the revised version: (free PDF availabe at my section of the Ravelry store)


Window Cats

C. A. Lira 2008 (rev 2009)

Note: crochet thread size 10
hook size 9 (1.75mm)

Wider Window Cat - finished height 1 3/8”
1) ch3, slst into 2nd ch from hook, hdc in 1st ch worked, ch5, slst into 2nd ch
from hook, hdc into next ch (3rd ch of ch5) , ch2 t
2) sc in sc of previous row, sc in each of next 2 sts, 2sc in next st, ch2 t
3) skip 1st sc, sc in next 4 sts, sc in turning chain of previous row, ch2 t
4) scdec (include 1st sc), sc in next 2sts , scdec (include turning ch of
previous row), ch2 t
5) sk 1st st, (scdec) twice (include turning chain in 2nd dec), ch2 t
6) sc in each of 1st 2sts (including 1st sc), 2sc in next st, ch2 t
7) sc in each of 1st 3sts (including 1st sc) , 2sc in next st, ch2 t
8) sc in 1st 5sts (including 1st sc), 2sc in turning ch, ch2 t
9) sc in 1st 7sts (including 1st sc), 2sc in turning ch, ch2 t
10) sc in 1st 8sts (including 1st sc), 2sc in turning ch, ch2 t
11) sk 1st sc, sc in next 8sts, ch2 t
12) scdec (include turning ch), sc in each of next 5sts, scdec, sk turning ch of
prev row, ch2 t
13) sk turning ch, scdec, sc in each of next 3sts, scdec (include turning ch),
do not turn
14) ch12, hdc in 2nd ch from hook, sc in next ch, 2sc in next ch, sc in each of
next 7 chs, going up toward head sk last 2 Rows of body, slst to next st
on side of body, end off

Rounded Window Cat - finished height 1 ¼”
1) ch3, slst into 2nd ch from hook, hdc in 1st ch worked, ch5, slst into 2nd ch
from hook, hdc into next ch (3rd ch of ch5), ch2 t
2) sc in sc of previous row, sc in each of next 2 sts, 2sc in next st, ch2 t
3) skip 1st sc, sc in next 4 sts, sc in turning chain of previous row, ch2 t
4) scdec (include 1st sc), sc in next 2sts , scdec (include turning ch of
previous row), ch2 t
5) sk 1st st, (scdec) twice (include turning chain in 2nd dec), ch2 t
6) sc in each of 1st 2sts (including 1st sc), 2sc in next st, ch2 t
7) sc in each of 1st 3sts (including 1st sc) , 2sc in next st, ch2 t
8) sc in 1st 5sts (including 1st sc), 2sc in turning ch, ch2
9) sc in 1st 7sts (including 1st sc), 2sc in turning ch, ch2 t
10) sc in 1st 8sts, 2sc in turning ch, ch2 t
11) sk 1st sc, scdec, sc ineach of next 5sts, scdec, sk turning ch of prev row,
ch2 t
12) sk 1st sc, scdec, sc in each of next 3sts, scdec (include turning ch), ch2 t
13) sk 1st sc, scdec, sc in next st, scdec (including turning ch), do not turn
14) ch12, hdc in 2nd ch from hook, sc in next ch, 2sc in next ch, sc in each of
next 7chs, working up toward head sk last 2 Rows of body, slst to side of
next Row on body, end off

Window Kitten Kitty - finished height 1 ½”
1) ch3, slst in 2nd ch from hook, sc in next ch (first ch worked), ch5, slst in
2nd ch from hook, sc in next ch (3rd ch of ch5), ch2 t
2) sc in 1st sc of previous row, sc in each of next 2sts, 2sc in next st, ch2 t
3) sk 1st sc, sc in each of next 5sts, ch2 t
4) sk turning ch of previous row, scdec, sc in each of next 2sts, scdec
(include turning ch of previous row), ch2 t
5) sk1st sc, (scdec) twice (include turning ch in 2nd dec), ch2 t
6) sc in each of next 2 sts, 2sc in turning ch, ch2 t
7) sc in 1st 3 sts, 2sc in next st, sk turning ch, ch2 t
8) sk turning ch, sc in each of next 6sts (include turning ch), ch2 t
9) sk 1st st, sc in each of next 6 sts, do not turn
10) ch12, sk 1st ch, 2sc in each of next 3chs, sc in each of next 7chs, slst to
body at end of Row 9, end off

Teddy Bear Applique


Crochet - Teddy Bear Applique

Teddy Bear Applique
Designed by Crafts by Starlight
All Rights Reserved
So Cute! This Bear is made from Baby Cake Chenille yarn. You can also use a light size 3 yarn. This will go great on pillows, blankets, etc for your kids.

Materials: Baby Cake Chenille yarn or light size 3 yarn; Colors: Light brown and dark brown. Crochet hook size F. Darning need and brown thread

SL = Slip Stitch
SC = Single Crochet

SC2tog = Sichle Crochet 2 stitches together
SP(S) = Space(s)
CC = Change Color

Head: Dark Brown
Base: Ch 3
Rnd 1: 7 SC in 1st CH made, SL to 1st SC made, CH 1, turn.
Rnd 2: 2 SC in each sp around, SL to 1st SC made, CH 1, turn. (14 sts)
RNd 3: *SC, 2 SC in next sp, SL to 1st SC made, CH 1, turn.

Snout: Light Brown
Base: CH 3
Rnd 1: 7 SC in 1st CH sp made, SL to 1st SC made, Tie off. Hide string.

Ears: Light Brown
Base: CH 3
Rnd 1: 4 SC in 1st CH made, CC to Dark brown, CH 1, turn.
Rnd 2: 2 SC in each sp, tie off.
Tummy: Light Brown
Base: Ch 5
Row 1: 4 SC, CH1, turn.
Row2: 2 SC in 1st sp, 2 SC, 2 SC in last sp, CH 1, turn.
Row 3-4: 6 SC, CH 1 turn.
Row 5: SC2tog, 3 SC, SC2tog, CH 1 turn.
Row 6: 4 SC, CC to dark brown, CH 1, turn.
Row 7: SC around Perimeter 2 SC in the corner sts to it will lay flat.

Legs (2): Dark Brown
Base: Ch 4
Row 1-2: 3 SC, Ch 1, turn.
Row 3: SC, SK 1 sp, in next sp (4DC, SL) tie off, hide string.

Arms (2): Dark Brown
Base: CH 3
Row 1: 4 SC in 1st CH made, CH 1, turn.
Row 2: 2 SC in each sp across, tie off hide string.

Take a needle and brown thread and sew all the pieces together. Then sew on your intended project.
http://www.craftown.com/Teddy-Bear-Applique.html

Cats All Over the Place


Cats All Over the Place.

Now who would have imagined that the aromas of Thanskgiving would drive my cats that extra level of bonkers that makes them so darned endearing? :-]

These last two cat appliques are my favorites. They are in my usual, more confusing style - hard to figure out just what I mean by the written directions. Hope the charts help out! :-)


Stretching Cat Appliqué
C. A. Lira 2008

Note: crochet thread sz 10
hk size 9 (1.75mm)
finished height ~2”

ch21
Hind Leg
hdc, sc, sc & 2 hdc in next st, sc, hdc

Tail
ch12, scdec, sc4, scdec, sc2, hdc & dc in next st, dc in side of hdc, dc in same st as hdc

Rump
trc, trcdec

Chest
trc2, dc, dcdec

Head
Ear
ch5, slst, hdc, dc

Nose
ch3, sc, hdc, slst side of dc

Mouth
ch2, slst, sc in ch under ear

Neck
sc in side of dcdec of chest

Shoulder
hdc in same ch as dcdec of chest, sc

Front Paw
slst5, hdc, slst in same ch, end off


Cat Loaf Appliqué
C. A. Lira 2008

Note: crochet thread sz 10
hk size 9 (1.75mm)
finished length 1 ¼”

ch11
Rump
sc, hdc2, dc4, hdc

Head
Ear
ch5, slst, hdc

Face
ch1, trc in ch under ear, ch1, slst in side of trc, hdc next ch

Front Paws – top
sc side of hdc, slst2, ch1

Front Paws – bottom
sc3 in lps remaining from base ch

Tummy – under
slst3

Rear Paws – under
ch1, sc, hdc3, sc

Tail
ch5, slst to body at st 3rd from end, slst 2 at angle on body,
slst back in 6 slsts slst2 next ch, slst, slst to body, end off.


Sun Motif


Sun Motif Crochet Pattern


Sun Motif Crochet Pattern
by Debbie Williams

WW Yarn
Size G hook

Rnd 1: Chain 4, Make 9 double crochets in 4th chain from hook (the first one) Join to top of chain 4 with a slip stitch = 10

Rnd 2:Chain 1, single crochet in same space as joining, do 2 single crochets in each double crochet around.Join to first single crochet with a slip stitch.=20

Rnd 3: * Chain 7, Single Crochet in 2nd chain from hook, and the next 3 chains. Do 3 double crochets all in the next chain, single crochet in the next chain. Single crochet in the next 3 single crochets on Rnd 2. Repeat from * until 7 "rays" are done. Slip stitch in the base of first ray. Finish off, weave in loose end.http://debs1967.blogspot.com/2009/04/sun-motif-crochet-pattern.html

Sun


Free Crochet Pattern: Sun

By Rachel – 6 Comments
Here is another scrap yarn project! This sun can be used as an applique for clothing or bags. Or you may choose to use it as a fridgie by sticking a magnet to the back and putting it on your refrigerator. It’s all up to you and it’s really fast to crochet!
Skill Level:crochet skill level easy
Finished Size: 5 1/2″ (14 cm) diameter including the rays
crochet sun
Materials:
Medium Weight Yarn (small amount)
Crochet Hook I (5.50 mm)
crochet yarn size 4
Crochet Pattern: Sun
Round 1: ch 4, 12 dc in forth ch from hook, sl st in top of beg ch: 12 dc
Round 2: ch 3, 2 dc in each dc around: sl st in top of beg ch-3: 24 dc
Round 3: (ch 8, sc in second ch from hook, sc in next 6 ch, sl st in next 2 dc) 12 times
Finish off.
Need help with crocheting the sun? Let me know!

Птички


So Cute on a Little Hat!!!


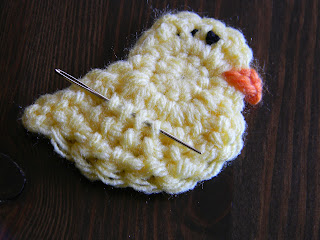
You can use any yarn with appropriate size hook for this.  The yarn type & hook size will determine the finished size of the chick. The yellow one is made with worsted weight yarn & a 5mm hook. The finished size is 2.75 inches beak to tail & 2.5 inches top to bottom.

Here is the basic technique.
ch = chain 
sl st = slip stitch
sc = single crochet
dc = double crochet
hdc = half double crochet
trc = triple crochet
quadc = quadruple crochet, yo 3 times, insert hook into st, pull up loop, yo pull through 2 loop 4 times
pentc = penta crochet, yo 4 times, insert hook into st, pull up loop, yo pull through 2 loops 5 times

Sorry for the weird names of quadc & pentc, but I don't know the names of these stitches, so I called them what made sense to me. Does anyone know their official name? Couldn't find it on google.

R1 - 10 sc in a magic loop. If you don't know how to crochet in a magic loop you can watch a video here.  Tighten your magic loop but do not join with a slip stitch as you may be accustomed to doing. Instead just make the first stitch on the second round in the first sc of the first round. 

R2 - 2sc in the first st (you may want to mark the first sc with a stitch marker), sc in 2nd, hdc then dc in 3rd, 2dc in 4th and 5th, 2sc in 6th, sc then dc in 7th,  2 trc in 8th, 2 quadc in 9th,  2 quadc in 10th. Again do not join.

R3 - Now your next stitch should be the first sc of the second round. In this stitch do 2 quadc & 1 pentac. Ch1, sl st in the same space (this will give a tiny point to the tail feathers). Now sl st down the side of the pentc going right to left. Join when you meet up with the next stitch.  It will look like this.


Now you should see the shape of the chick, but the tail part has such long stitches that it doesn't hold together.  So, tie off leaving a long tail to sew with. Flip the chick over and sew up and down the backs of all those stitches.  You will see little loops going up the back of each stitch.
Sew up and down under these little loops in rows to secure your stitches together.


For the eye sew a french knot between the 7th & 8th stitch of the second round. I first sewed a small straight stitch between the two catching a few threads from each and then sewed the french knot into the straight stitch to give it something to hold on to. 

For the beak - join beak yarn in the 10th stitch of the second row. sc in the same stitch. fasten off and weave ends.

Hope you enjoy making these chickies! If you do please let me know! I'd love to see pic's! If you have any questions please don't hesitate to ask in comments or email me at mail.oodles4noodles@gmail.com

 © 2011 Carrie A. Piper
****You may do anything you like with items you make using my patterns.  If you sell them on-line I only ask that you link back to the post. You may also link back to this post on any blog or website. Please do not copy any part of this pattern and claim it as your own or copy and re-post it elsewhere. Thank You ****http://oodles4noodles.blogspot.com/2011/04/turorial-tuesdays-spring-chick-applique.html

Snowman Applique

This has not been tested.

Snowman Appliqué 
Copyright 2007 (Do not sell this pattern)
CrochetbyCharlene


Any yarn desired. This will make your snowman different sizes.
I used Caron Simply Soft 

You will need:

F Hook
H Hook
J Hook
Tiny buttons or Pom Poms
Wiggle Eyes

Large Circle: Chain 4 and make a ring. Chain 2 (not a stitch).
Rd. 1 12 hdc in ring. join to 1st hdc. Chain 2 (12 hdc)
Rd. 2 2 hdc in each hdc around. Join to 1st hdc (24 hdc)
Do not fasten off, but change to H hook. 

Middle Circle: Chain 3. 
Rd. 1 12 hdc in 3rd chain from hook Join to 1st hdc (12 hdc)
Rd. 2 Repeat previous Round 2. (24 hdc)
Do not fasten off. Change to F hook.

Small circle: Repeat middle circle. 

Edging: Change back to H Hook. Slip stitch around joining circles. Fasten off and weave in ends, 

Nose: Chain 4 Slip Stitch in 4th chain from hook and fasten off. Put ends in the middle of the small circle and weave in the ends, 

Hat: H Hook.
Chain 11 
Row 1 Sc in 2nd chain from hook across. (10 sc) turn
Row 2 slipstitch in the 1st 2 sc. Chain 1 hdc in same stitch and in the next 5 sc. Chain 1 (hdc) turn. 
Row 3 sc across (6 sc)
Row 4 Repeat row 3. http://www.crochetville.org/forum/showpost.php?p=967400&postcount=1